Best Practices For Google Analytics
/Google Analytics is an amazing tool that helps SEOs, Marketers, Business Owners and companies as a whole understand how people are interacting with a website. This free tool tracks users from when they first visit a site all the way through their exit, it can even tell if the user comes back. It is a must for any website and can really help in targeting online and offline strategies.
Use Tag Manager
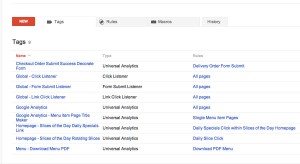
Google’s tool /Tag Manager is the preferred method to implement all code on a website. It allows you to pass JavaScript onto a site from the Tag Manager Interface eliminating the need to edit the actual page or need for ftp access. This product is amazing and well worth learning; it will make your websites better.
Multiple Accounts

There are three sections to Google Analytics: Accounts, Properties and Views. It is recommended that two accounts are created to access the information in your site.
Master Account
A master account that can view everything and make changes.
Read Only
Read only account that can only view the data, not make any changes. This can be shared to anyone who will need to view the data.
Link Google Properties
Google has created some other great tools that can be linked to Google Analytics. These tools can enhance your data set and help find valuable insights to campaigns.
Search Console (Webmaster Tools)

Google Search Console is a fantastic interface Google has created to help website owners manage their sites. When linking this tool to Google Analytics you will gain Search Engine Optimization information like search queries, search landing pages and search locations.
AdWords

AdWords is a marketing platform that Google has created to help companies advertise online. Linking AdWords to Google Analytics will allow you to import Google Analytics Goals and transactions into AdWords as conversions, view Google Analytics site engagement data in AdWords, create remarketing lists in Analytics to use in AdWords for targeting specific audiences and automatically view your AdWords click and cost data alongside your Analytics site engagement data.
In almost all instances the auto-tagging feature should be turned on. This will allow everything to sync seamlessly between the two platforms.
Create Views
Views are a great way to slice data into segments that have important business functions for you. It is recommended to create four basic views, followed by others as you find the need.
Unfiltered View
Create a view without any filters so all of the raw data can be seen.
Master View
This is the view that will be used 99% of the time. It filters out all of the unneeded data and formats the data so it is uniform. For this View, all the filters in the filters section should be applied.
Testing View
Create a view that includes only the IP address of the people testing the site so they can see only their traffic when conducting a test. To do this, add a filter that includes an IP address instead of excludes.
Sandbox View
Create a view that is set up exactly like the Master View. This view will be used to implement changes and see results on the entire data set before placing them on the Master View.
View Filters
Filters are a great way to massage the data that comes into Google Analytics. Best practices suggest that filters should be used to ensure uniformity to the data, prevent fractional data and prevent incorrect data from being inputted. It is important that they are placed in the order stated within this article as they work in the order they are added, meaning, the first filter added will be applied to all data, then the second filter added will be applied to the filtered data, and so on. Filters are set at the view level; these filters listed below should be applied to three of the four view types suggested above, the exception being unfiltered.
Lowercase URLs
To avoid fractionized data due to capitalization, filters can be implemented to ensure all page URLs in Google Analytics are all lower case. This can be done with four filters.
Lowercase Hostname
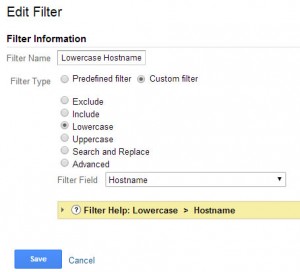
This will lowercase the hostname of your site so any capitalization by the user or a linking site will be changed so it is uniform with the rest of the data.
Steps:
- In the Admin select the “Filters” option under the view you would like this applied to
- Press the + New Filter Button
- Name the filter “Lowercase Hostname”
- Create a custom filter
- Select “Lowercase”
- Choose “Hostname” as Filter Field
Lowercase Page Path
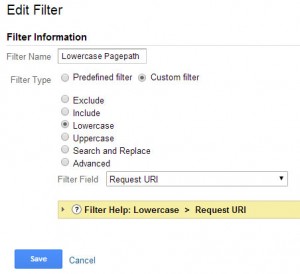
This will lowercase the page path of your site so any capitalization by the user or a linking site will be changed so it is uniform with the rest of the data.
Steps:
- In the Admin select the “Filters” option under the view you would like this applied to
- Press the + New Filter Button
- Name the filter “Lowercase Page Path”
- Create a custom filter
- Select “Lowercase”
- Choose “Request URI” as Filter Field
Lowercase Campaign Source
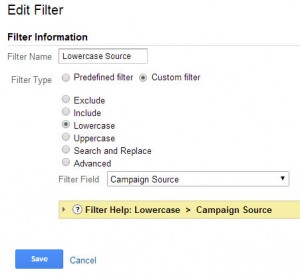
This will lowercase the campaign source if you use them in any URL.
Steps:
- In the Admin select the “Filters” option under the view you would like this applied to
- Press the + New Filter Button
- Name the filter “Lowercase Campaign Source”
- Create a custom filter
- Select “Lowercase”
- Choose “Campaign Source” as Filter Field
Lowercase Campaign Medium
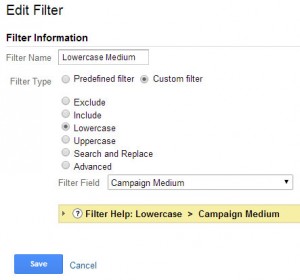
This will lowercase the campaign medium if you use them in any URL.
Steps:
- In the Admin select the “Filters” option under the view you would like this applied to
- Press the + New Filter Button
- Name the filter “Lowercase Campaign Medium”
- Create a custom filter
- Select “Lowercase”
- Choose “Campaign Medium” as Filter Field
Remove Trailing Index
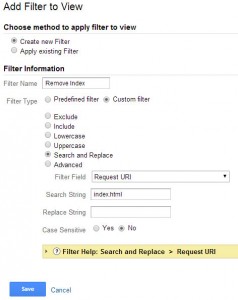
Some sites may have the index.html or index.php file at the end of some pages. This can divide data of one page into two in some instances. To prevent that, the index file can be removed from Google Analytics.
Steps:
- In the Admin select the “Filters” option under the view you would like this applied to
- Press the + New Filter Button
- Name the filter “Remove Index File”
- Create a custom filter
- Select “Search and Replace”
- Choose “Request URI” as Filter Field
- Search String “index.html”
- Replace String is left blank
Prepend Hostname
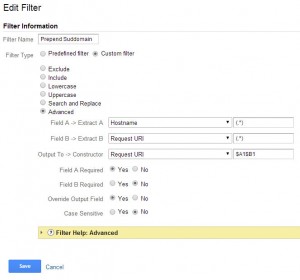
To make the data in analytics a bit easier to understand, it is recommended to add the hostname to all the data. This is especially important if cross domain tracking is turned on or subdomains are being tracked.
Steps:
- In the Admin select the “Filters” option under the view you would like this applied to
- Press the + New Filter Button
- Name the filter “Prepend Hostname”
- Create a Custom filter
- Select “Advanced”
- In Field A -> Extract A choose Hostname then (.*) in the box next to the drop down
- In Field B -> Extract B choose Request URI then (.*) in the box next to the drop down
- In the Output To -> Constructor choose Request URI then $A1$B1 in the box next to the drop down
- Field A is required
- Field B is not required
- Do override output field
- It is not case sensitive
Exclude Company IP
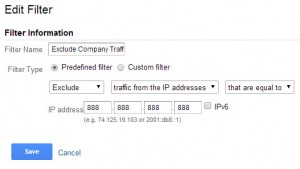
Lots of traffic may come to your website from your employees or website providers. Because this activity can greatly skew data, especially if something is being tested, it is recommend to block all /IP addresses associated with your employees or vendors. To do this, a filter will need to be made for each IP address that will be blocked.
Steps:
- In the Admin select the “Filters” option under the view you would like this applied to
- Press the + New Filter Button
- Name the filter “Exclude Company IP Addresses”
- Create a predefined filter
- Select “Exclude”
- Select “traffic from the IP addresses”
- Select “that are equal to”
- Enter the IP you wish to be blocked
White List Host Domains
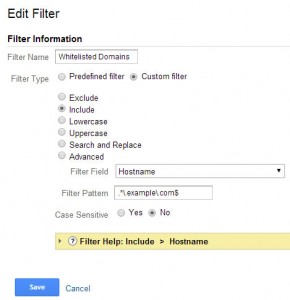
Create a white list of domains that will be sending Analytics data so no one can maliciously alter your data by placing your code on their site.
Steps:
- In the Admin select the “Filters” option under the view you would like this applied to
- Press the + New Filter Button
- Name the filter “Whitelisted Domains”
- Create a custom filter
- Select “Include”
- Choose “Hostname” as Filter Field
- Use a Regular Expression of .*.example.com$ If you are cross linking domains use the pipe (|) to separate each
Customize Analytics to Fit Website
Google Analytics is a great tool straight out of the box. Where it shines is how it can be customized to display data you want the way you want it. There are many ways to customize this tool to enhance your understanding of a website.
Set Up Events

Events are a great way to find out how people are interacting with a website. They are a must for any website; it is a best practice to have an event for any action that does not take a user to a different internal page. Some examples of what can be tracked by events are:
- Contact form submissions
- Clicking on social media buttons
- Clicking on an outbound link
- Plays a video
- File downloads
- Form errors
- Tracking clicks on embedded maps
Event tracking requires some custom coding. The best way to implement events is through Google Tag Manager.
Set Up Goals

Goals are a great way to track the /ROI of your website. They can be setup in four different types of ways: Destination, Duration, Pages Per Session and Events. Values should be implemented for the goal even if arbitrary. Funnels can be set up for destination goals so you can see where people are joining or dropping out of the conversion process. To set up goals select goals in the View section of the admin. It is important to note that each view is limited to 20 goals.
Create Custom Dimensions & Metrics
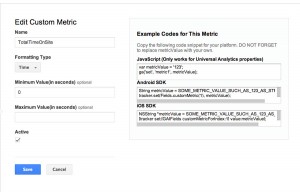
Custom Dimensions and Metrics are the preferred way to append data to Google Analytics. This feature allows one to customize analytics for business specific needs. You can set these up using Google Tag Manager, then in the Google Analytics Admin, under Property settings, choose Custom Definitions to set up either a metric or dimension. A good trick to remembering the difference between dimensions and metrics is to remember that metrics are typically numerical values while dimensions are not. These can be very useful to append user data if you are using the Facebook API to perform logins to your site. Other things that may be useful are weather data, page creation data, page author and page category.
Create Custom Channel Groupings
Google Analytics does a great job of creating default channel groupings. There are still some instances where a set of sites should be grouped together. A great example would be a Guest Blog Post written by the staff on other sites. By creating a custom channel grouping you can easily segment traffic from the posts.
Create Custom Content Groupings
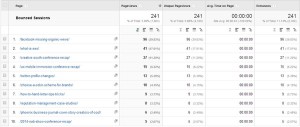
Much like custom channel groupings, content groupings combine data into a subset that can be easily tracked. Here we use a group to track our blog data. It can be used to track any section or type of a site. These are very useful on ecommerce websites helping segment product and category pages apart.
Create Advanced Segments

Advanced Segments are used to cut up data quickly to include or exclude a certain data set. Unlike almost everything else discussed in this article, Advanced Segments are not permanent. Segments can be extremely customized for a specific website. Some Segments we use are blog post entrances, exclude bounces and page views over 3. The more and more one uses analytics, the more often they will find instances for segmentation.
Keeping Track Of A Website
Once Google Analytics has been set up properly it is important to track changes in the data and updates to Analytics.
Annotations

/Annotations are used to track changes and updates to a website or Google Analytics. They are perhaps the most important element in Google Analytics. Any change, no matter how small, should be noted. This allows users to look at data in Google Analytics, no matter how old, and easily understand that the traffic dropped off completely for four hours one day, three years ago because the site went down, or allows users to see that the organic traffic began to increase dramatically after a blog was added to the site. Adding in annotations at the time these events take place ensures there is no guessing taking place in the future.
Custom Alerts
Custom Alerts are an underutilized tool. They will alert a defined set of people to anomalies in the data. By creating alert points in analytics, an email can be sent to anyone selected alerting them of change.
Analytics Has Flat Lined
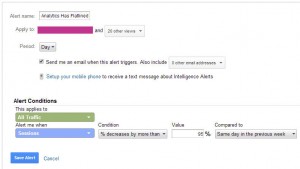
Perhaps the most important alert, this will trigger if traffic stops coming to the site. This is often caused by removing the Google Analytics code from the page.
Steps
- In the Admin select the “Custom Alerts” option under the view you would like this applied to
- Press the + New Alert Button
- Name the filter “Analytics Has Flat Lined”
- Set period to “Day”
- Apply to “All Traffic”
- Alert when “Sessions”
- Condition “% Decreases by more than”
- Value 95%
- Compared to “Same day in the previous week”
Organic Search Declines 50% in a Week
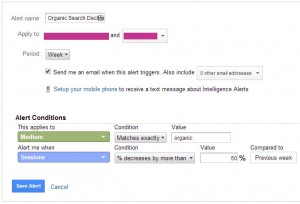
This alert will let one know if /organic traffic drops drastically. This can signify a /Google Penalty, dropping in rankings or an indexation issue with your site.
Steps
- In the Admin select the “Custom Alerts” option under the view you would like this applied to
- Press the + New Alert Button
- Name the filter “Organic Search Declines 50% in a Week”
- Set period to “Week”
- Apply to “Medium”
- Condition “Matches Exactly”
- Value “Organic”
- Alert me when “Sessions”
- Condition “% Decreases by more than”
- Value 50%
- Compared to “Previous week”
Page Speed Increase 50% In A Day
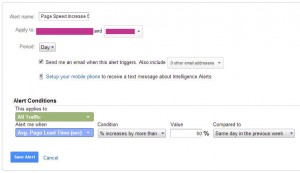
Tracking your page speed can alert one to page loading issues. These alerts will often alert of something wrong with your site causing it to load slowly.
Steps
- In the Admin select the “Custom Alerts” option under the view you would like this applied to
- Press the + New Alert Button
- Name the filter “Page Speed Increase 50% In A Day”
- Set period to “Day”
- Apply to “All Traffic”
- Alert me when “Avg. Page Load Time (sec)”
- Condition “% Increases by more than”
- Value 50%
- Compared to “Same day in the previous week”
Traffic Spike
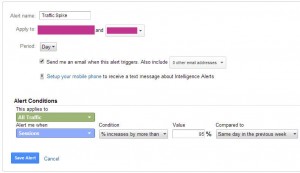
This alert will let one know if large amounts of traffic have come to the site in a single day. This can be caused by a media campaign, bot crawling issues or general internet buzz.
Steps
- In the Admin select the “Custom Alerts” option under the view you would like this applied to
- Press the + New Alert Button
- Name the filter “Traffic Spike”
- Set period to “Day”
- Apply to “All Traffic”
- Alert me when “Sessions”
- Condition “% Increases by more than”
- Value 95%
- Compared to “Same day in the previous week”
Social Media Increase 50% In A Day
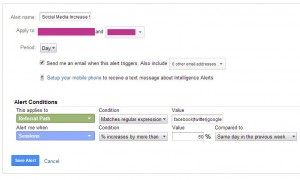
This alert will let site owners know if something has gone viral.
Steps
- In the Admin select the “Custom Alerts” option under the view you would like this applied to
- Press the + New Alert Button
- Name the filter “Social Media Increase 50% In A Day”
- Set period to “Day”
- Apply to “Referral Path”
- Condition “Matches regular expression”
- Value “facebook|twitter|google|pinterest|instagram|youtube”
- Alert me when “Sessions”
- Condition “% Increases by more than”
- Value 50%
- Compared to “Same day in the previous week”
Turn on Site Search

Site search is a great way to see what people are searching for on your site. We often use it for content ideas or to add to content already written. You can turn this on in the view settings.
Conclusion
Google Analytics is a great tool that every website should use. By customizing the set up using this guide, one can gain the greatest value from the product. All websites are different; be sure to customize Google Analytics for what makes the most sense for your business.
