Our client needed a robust solution to their attribution challenges within their analytics platform, Google Analytics. Google Analytics offers an out of the box solution for attribution, but our client desired a custom solution to better fit their reporting needs, and as a Customer Data Platform agency (CDP agency), we were in a position to help. In addition, they wanted this same attribution data to power CDP audience creation within their Google Ads account.
Our client was using Tealium as their Customer Data Platform, but ran into a common pitfall when configuring their Google Ads connector via AudienceStream. The Google Ads connector requires a whitelisting process before integration. Not only can this whitelisting process be lengthy, but it is not always a guarantee. With our client nearing their own internal deadline, our team opted for an alternative, customized solution as not to derail the project. This implementation is outlined within Tealium’s How to Pass a Google Analytics Custom Dimension through AudienceStream for RSLA Ads. Please refer to this article to properly configure the Google Client ID necessary for the EventStream and AudienceStream portion of our process. As well as a supplementary guide for those general configurations we will be covering in this article.
Our biggest hurdle was distinguishing attribution data from Tealium’s TiQ and AudienceStream. Our client wanted this data across both products, but we needed a way to distinguish between the two as they served different purposes. Let’s review how we were able to accomplish this by building off Tealium’s solution above. First, we’ll dive into the TiQ implementation, as it will serve as the foundation for everything we do.
TiQ Implementation
Defining Attribution within the Channel Extension
First things first, let’s define our attribution by utilizing the Channel Extension. This allows us to define conditional criteria for Channel Name and Category. For our client, they were utilizing Google Analytics UTM query parameters to pass in this data.
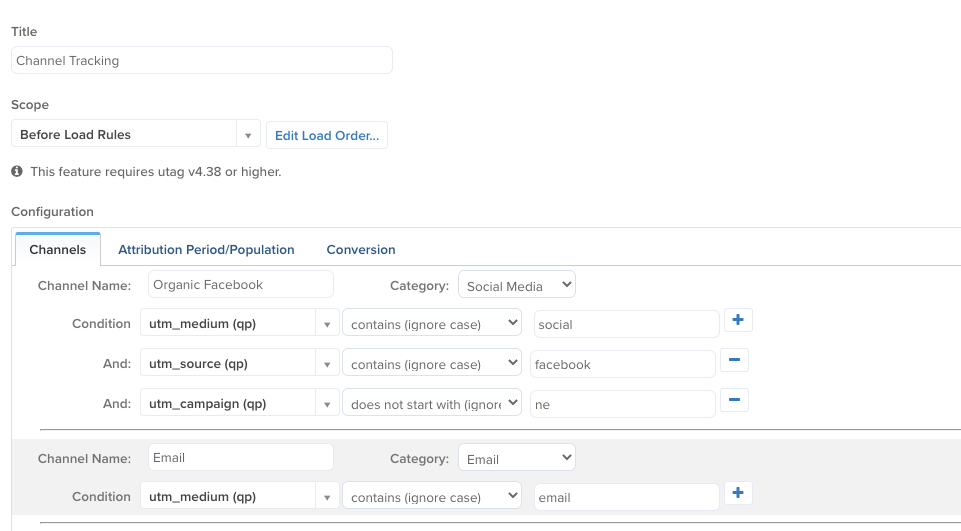
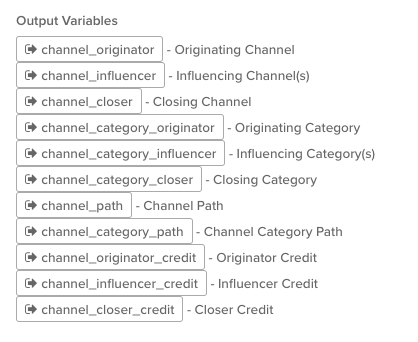
With those channels and categories defined, our data layer gets populated with the following 10 output variables to be used in load rules, extensions, and data mappings:
- channel_originator – Originating Channel
- channel_influencer – Influencing Channels(s)
- channel_closer – Closing Channel
- channel_category_originator – Originating Category
- channel_category_influencer – Influencing Category(s)
- channel_category_closer – Closing Category
- channel_path – Channel Path
- channel_category_path – Channel Category Path
- channel_originator_credit – Originator Credit
- channel_influencer_credit – Influencer Credit
- channel_closer_credit – Closer Credit
These will serve as the values that will populate our custom dimensions within TiQ and AudienceStream.
Custom Dimension Configuration
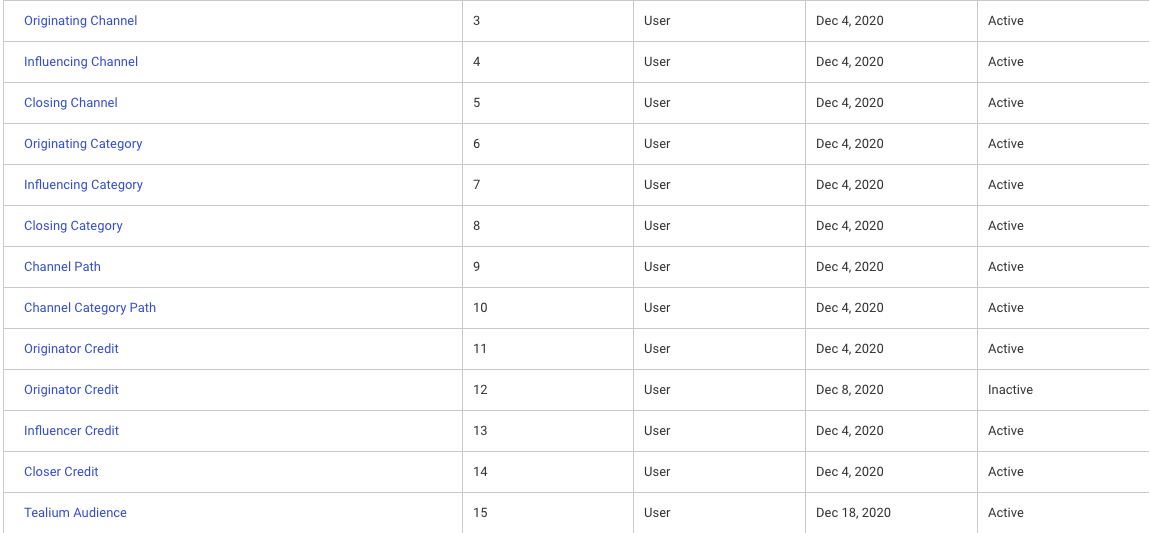
Moving into Google Analytics under your desired property, you can create custom dimensions for the output variables listed above. Ensure that these custom dimensions are User scoped and have the state listed as “active”. Note that you are only allowed 20 custom dimensions within a single property. There are 11 channel variables listed above. Depending on your needs, you can bring in as few or as many as you want. In our configuration, we opted for a one-to-one naming convention to keep things streamlined between platforms.
Tip to Reducing Custom Dimensions
If you need to limit the number of custom dimensions within your property, I recommend bringing over the output variables that contain multiple values like Influencing Category(s), Channel Category(s), Channel Category Path and Channel Path. In something that we will cover in more detail later in the article, you can use regex within your conditional logic to target those first and last values within these variables.
Data Mapping with Google Analytics Tag
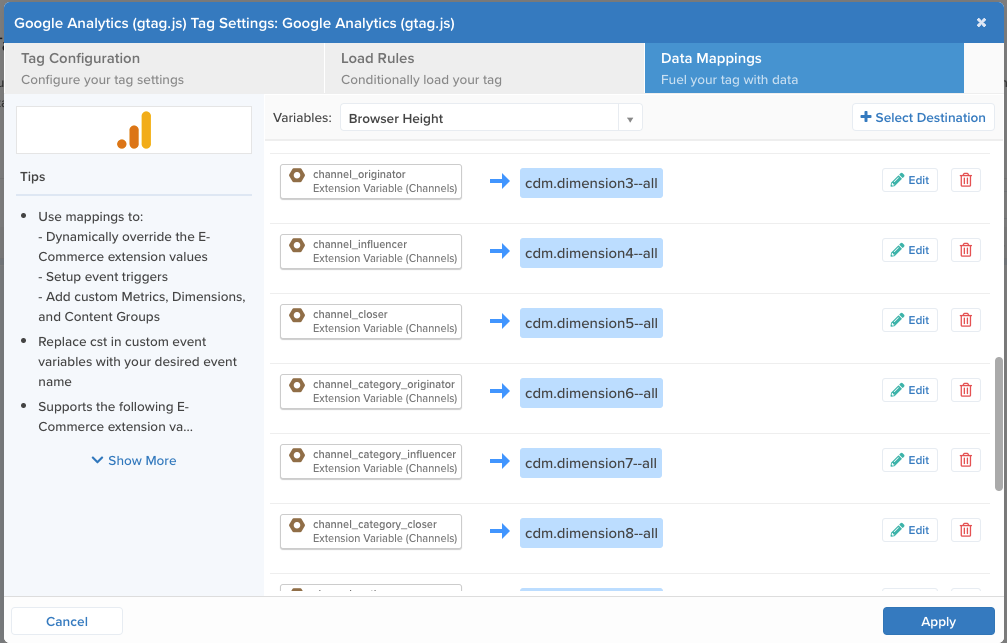
Let’s jump back into TiQ, where we will configure our Google Analytics tag to pass these Channel Extension variables into our newly created custom dimensions. Under Data Mapping, we will select an output variable and a data destination.
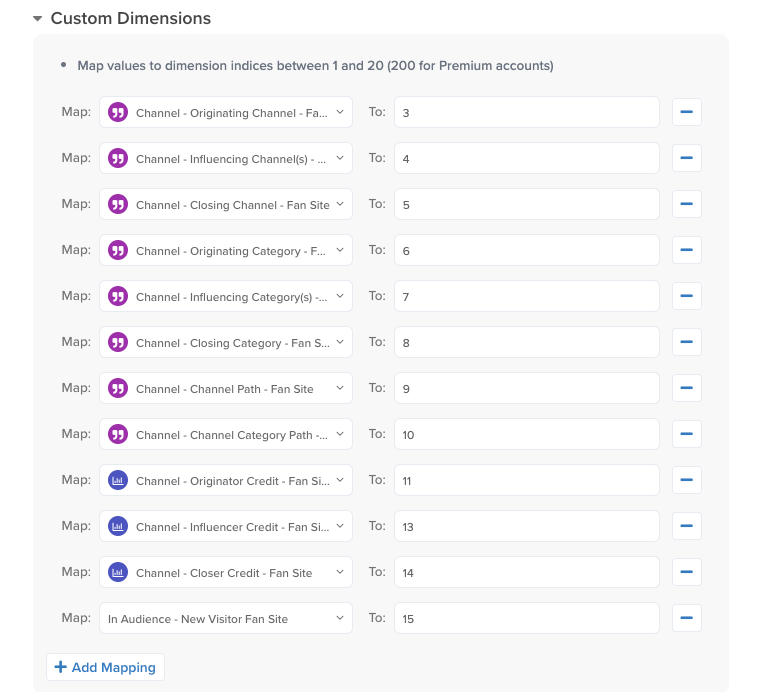
For a custom dimension, the category will be Dimensions. Within the dimension mapping screen, you will select an Event Type, Dimension, and an optional Name. For Dimension, pull the index from the Google Analytics admin. It should be a value from 1-20. Event Type for Channel and Category output variables will be “All Page Hits” as we will want this data collected on every page of the site. Since our client had Enhanced Ecommerce enabled within their Google Analytics account, we are able to leverage the “Purchase” Event Type for the Credit output variables. We only want to collect this data when a purchase is made on the site since we want actual purchase totals.
Mapping Channel Extension variable to Custom Dimension

All Channel Extension Variables mapped to Custom Dimensions.
Testing
With all the pieces in place, let’s test our configuration before publishing it to our production environment. Before testing, we need to ensure that we have our Tealium Tools Chrome Browser extension installed. Additionally, we need to add UTAG Debugger custom tool to our arsenal. Open the UTAG Debugger window and enable Cookie data to be displayed.
Configure Cookie Data in UTAG Debugger Window
![]()
Once our tools are established, navigate to your site with the UTM parameters to trigger the Channels Extension. Within the UTAG Debugger window, you will see the Channel Extension output variables populate. Test several UTM parameters to see how that data populates into the variables.
Testing with a singular channel.

Testing with multiple channels. Notice how Channel Category Path and Channel Path retain multiple values while Channel Category Closer and Channel Closer change with the latest value.
Since we mapped these variables to our Google Analytics tag, we can also test via the Network panel within Chrome DevTools. Since our custom dimensions are mapped to fire on “All Page Hits”, we can see that request come through each page we navigate to. Find the Google Analytics request, open the Headers tabs and scroll down to Query String Parameters. If custom dimensions are being passed, you will see cd[index] listed. These values should match what you are seeing in the UTAG Debugger.

To see this data within Google Analytics, you will need to wait 24 hours. Once that is available, you can start creating custom reports with this new data.
AudienceStream
Now that the TiQ portion is properly configured, we can jump into the AudienceStream side of things. Our time in AudienceStream will be spent passing over data into Google Analytics with the intention of creating those Remarketing Lists for Search Ads using custom audiences. At this point we may wonder why this portion is necessary since this data is being passed through TiQ already. We need the AudienceStream connector because unlike TiQ, which fires these custom dimensions on every page view and purchase event, we want these custom dimensions to fire when someone enters or leaves an audience.
Channel Output Variables as Visitor Attributes
We are bringing over the Channel Extension output variables into AudienceStream as visitor attributes. Make sure to account for the different data types such as strings for the Category and Channel output variables and numbers for the Credit output variables.

Google Analytics Connector
Please refer to the Tealium article listed in the beginning of this article for the general construction of the Google Analytics connector. For the event action and category naming convention, make it easily identifiable within the Google Analytics by providing some additional context around what this specific event represents. For instance, including the target audience along with the audience action like so: “Joined Audience Shop Cart Abandoner”.
As for the custom dimensions, this will be similar to what we did with our TiQ tag data mappings. Using the index, you will map the visitor attributes we created above. We will be adding one additional custom dimension here. This custom dimension will serve as the differentiator between the TiQ data and the AudienceStream data. For this custom dimension, we will not be passing a visitor attribute but a custom string. We can repurpose this custom dimension to pass custom strings which we will use in the Google Analytics admin when creating audiences.
Custom string used as value for Custom Dimension 15
Creating Google Analytics Audiences
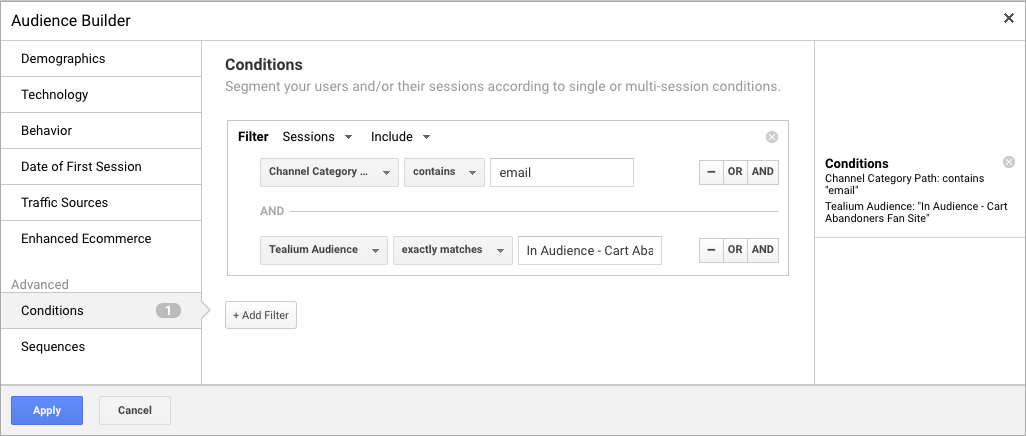
Within your property, we will be constructing the audience based on the custom dimensions we’ve passed in AudienceStream. Using conditional logic, you can construct these audiences to best fit your needs. One thing to remember is that we need to include that last custom dimension to ensure we are only pulling those individuals who we triggered by the AudienceStream connector.
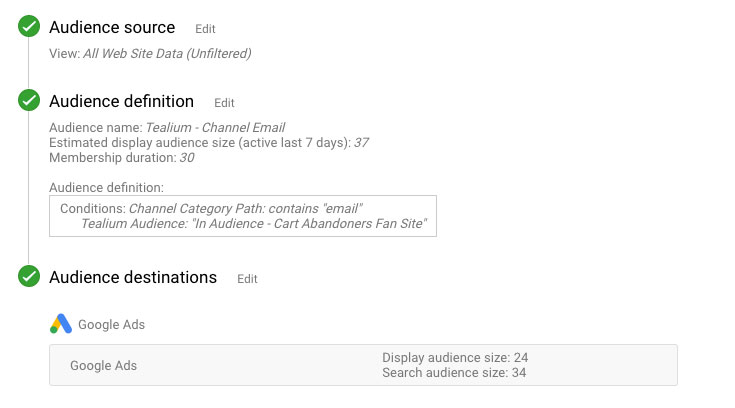
When that audience creation process is complete, Google Analytics will provide you with the relative size of your audiences for display and search. This will allow you to tweak the conditional logic to create more robust audiences depending on your needs.
Testing
To tie together all the hard work we’ve done, let’s test our AudienceStream connector. We will be using AudienceStream Trace within the Tealium Tools Chrome Extension. We will go through a similar process as we did for TiQ to ensure there is data for those custom dimensions but additionally making sure we are qualifying for our audience, the Cart Abandoner audience in this example, that will trigger our Google Analytics connector. Once these conditions are met, we will simulate the end of a visit by ending Trace. In trace, we should see that connector fire. If we click into the connector, you will see that request along with the data being passed. In this instance, we should see those custom dimensions being passed.

Viola! We have successfully completed our TiQ and AudienceStream configuration to allow our client to better report on attribution and build audiences for Remarketing Lists for Search Ads in Google Ads.
