Video Compression Overview
As I do a lot of video editing and 3D animation here at Zion & Zion for applications that range from social media video to website video to TV commercial production for our clients, I wanted to share some of my insight regarding video compression.
So you just finished your project—you sent it to your render, and once it is complete, you realize that your file size is nearly two gigs for a short two minute video! For most people, this is way too large of a file to work with. Why is a simple two minute video such a large file? And how do you get great looking footage at a smaller file size? Well let my pain be your gain—I hope after you read this article, you will have a basic understanding of how video compression works, and more importantly, how to compress your video project so that it looks great and is a smaller file size.
Video compression is an essential aspect to video streaming and delivery. Without it, there would be no way for sites like Vimeo and YouTube to exist. There are a few things to be aware of when getting ready to compress your footage or project for delivery. Firstly, there is no best way to compress, but a basic understanding of how video compression works will help you get the best quality footage for your intended use.
How to Compress Your Video
Intro to Codecs

When it comes to video compression, the first thing you need to understand is something called codec. A codec is basically the mathematics used to convert light and sound into numbers that can be stored and played back from a computer. There is no single codec—in fact, there are many codecs that you can choose from. Some popular codec’s include h264, Apple ProRes, and HDV, but what’s really important to understand is that codecs can be either lossless or lossy.
Lossless Codecs
Lossless codecs are codecs that don’t degrade the footage. This means they obtain a lot more information, but the file size is still much larger. This type of codec isn’t ideal for streaming. A lossless codec would be used to make a final version or master version of something that you could then later recompress to a lossy codec for delivery.
Lossy Codecs
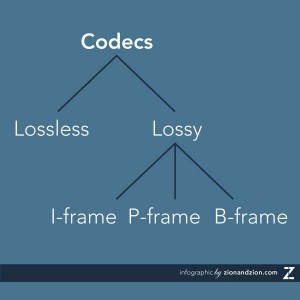
So that leaves us with lossy codecs. A lossy codec is a codec that loses some of its data in exchange for a smaller file size. It does this by eliminating redundancy. So for example, let’s say you have footage of a cityscape with little to no movement. Each frame is almost the same frame by frame, so because of this, your codec takes advantage of this aspect and only has to adjust for the moving aspects of the video and can eliminate a lot of unnecessary information. The lossy codec does this by breaking the frames into three different types of frames:
- I-frames
- P-frames
- B-frames
An I-frame is like a conventional image. It’s the highest quality frame of the three frames and it contains the most data. Next would be the P-frame—this only stores changes from the previous frame. Lastly, we have the B-frame which is the smallest of all three frames and is a prediction frame between I and P-frames. This process repeats itself over and over until the entire duration of your footage is complete. (see image 1 for an example)
Balance Frame Rate
So now that we have talked about codecs, including what they are and what they do, it is time to figure out how we get the best possible footage from our compression. The easiest answer to that is by balancing your bit rate for your specific footage.
Different frame rates and aspect ratios will affect what bit rate you will need for quality footage. If you need to be super detailed and right on the dot, you might want to try one of the many bit rate calculators easily found on the Internet. This calculator from /silverjuke is one of my personal favorites. The higher the bit rate, the better the footage will look, but with high quality footage also comes a larger file size.
Bit Rate Side-by-Side Example
Here is a side by side comparison between the same footage rendered out at different bit rates. The left has been compressed at .20 mbps (megabits per second) and the right has been compressed at 6 mpbs. As you can see, the left is super blocky and ugly. This is what we call compression artifacting, which is what happens when you push your compression too far for your aspect ration and fps (frames per second). To compensate for this, when getting ready to export, you can adjust your frame size to help with the artifacting. Bit rate comes in two different styles:
- CBR
- CBR stands for constant bit rate and it uses the same amount of data every second throughout the course of your footage.
- VBR
- VBR stands for variable bit rate and it adjusts the amount of data being used on the complexity between frames.
Between the two styles of bit rate, there is no perfect answer for you. You just have to play around with both options to see what style works best for your footage and your specific situation.
Container vs. Codec

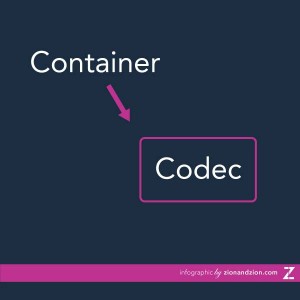
When I was first learning about video compression, the difference between a container and a codec was an area of confusion. Luckily, I have since found simple ways to remember which is which and am here to pass the information along. A container is what your codec is packed into so that your media player can read the file. Some examples of containers include .mov, .avi, and .mp4. Some of these containers can hold multiple codecs (but not at the same time). For example, a .mov container can hold codecs such as ProRes, h264, DVCPro, et al. But some containers can only hold one type of codec with the same file extension, which is often where the confusion comes into play.
Video Compression Settings
The settings you need for a proper compression depend on where your compressed video is going to be delivered to. If it’s going to, say something like Vimeo, YouTube, or another video hosting site on the web, I like to follow Vimeo’s guideline. But if it’s going to something like broadcast TV, your compression settings will have to be different, so try to get as much information as possible from your client. If your client says to just send a .mov or a an .avi, make sure they specify what codec they might need because remember! A .mov isn’t a codec, it’s a container. If the client doesn’t know, just be aware that you might have to render out multiple renders because while you sent them a .mov, it may not have been the right codec.
Conclusion
Now there is a lot more to video compression to learn, but really, if you want great looking footage, understanding the basics of video compression will help you get there!
